Lightroom, Capture One and Olympus
I’ve had some concerns about the sharpness of the images from the Olympus. I felt there was a touch too much noise, adding an ever so slight but very annoying blur to the images. Although every other aspect of the camera is great, I was starting to doubt whether the speed, portability and weather proofing were worth the loss of sharpness in the image.
Well the worry is over, thanks to a friend who commented on the brightness of an image. This comment triggered a thought about RAW conversion. It turns out that native RAW conversion for Olympus images in Lightroom isn’t quite what it could be. In my opinion of course.
I decided to try some other software for comparison, including Affinity Photo, OV3, and Capture One. I wanted to compare the import of each of them. After a few tests, it was quite clear which one was better, but I carried on and tested with different images, as well as images taken with various lenses, just to be sure. I feel that the quality of the import in Capture One is the one that suits me best.
So this post is to show a few comparison images taken from a 100% crop of the title image. As I feel that Capture One has the best results, the comparisons are all with Lightroom and Capture One. I’ve used this image as it’s simple, has clean, crisp, clear colours without too many fine details to distract from the sharpness of the image elements.
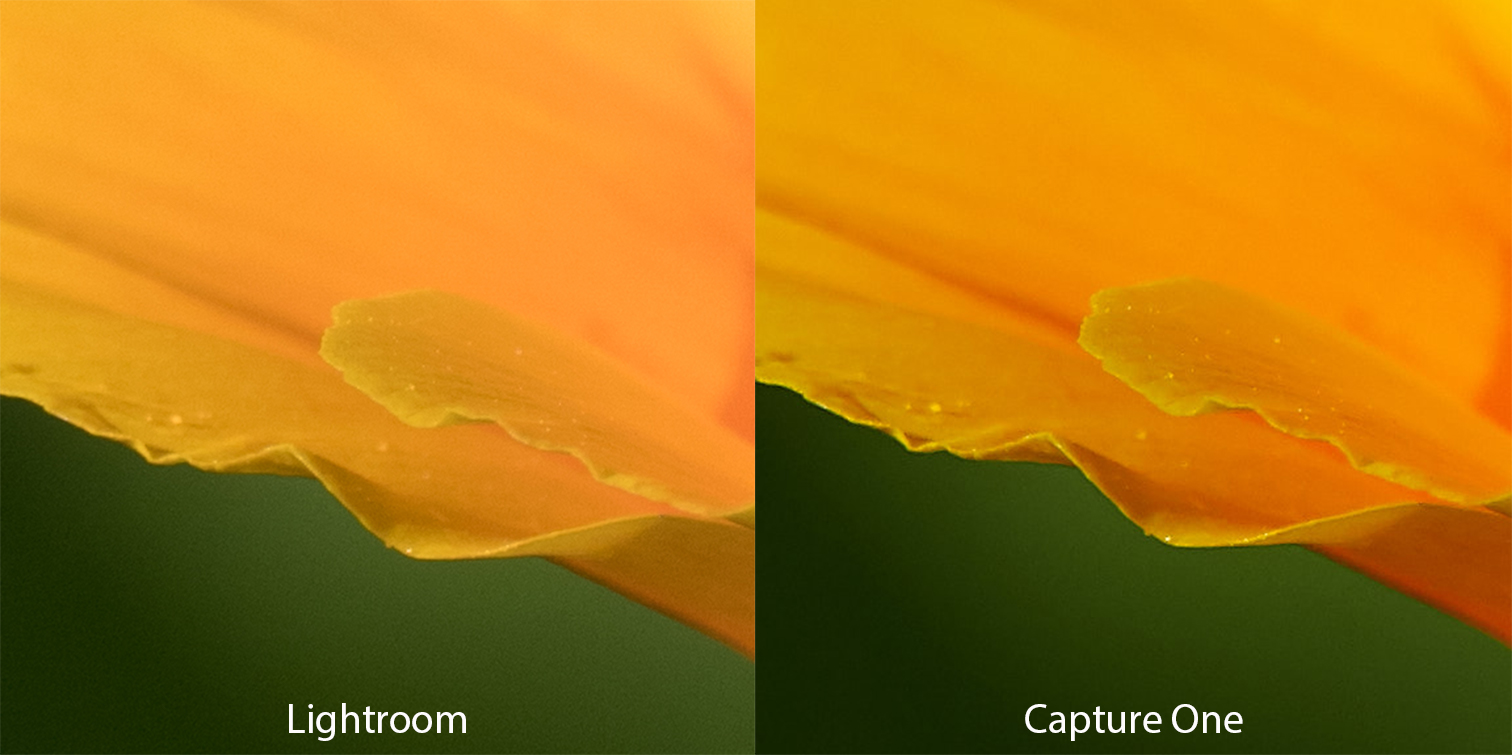
This first image is a comparison of a jpeg export. The same file was imported into Lightroom and Capture One, and then exported as a jpeg without making any manual adjustments in either software.

I feel that the image from Capture One has more vibrant colours, the fine details of the petals, and the water droplets on the petals are clearer, and the bokeh is smoother.
The colours in the Lightroom image are in comparison, dull, and the noise is far more noticeable.
As I’ve been using Lightroom for a long time with images from a Sony camera, I’m used to the software, and I would of course prefer to stay with it, so the next step was to try and see what I could do within Lightroom to be able to get closer to the Capture One image, with the intention of applying these on import.
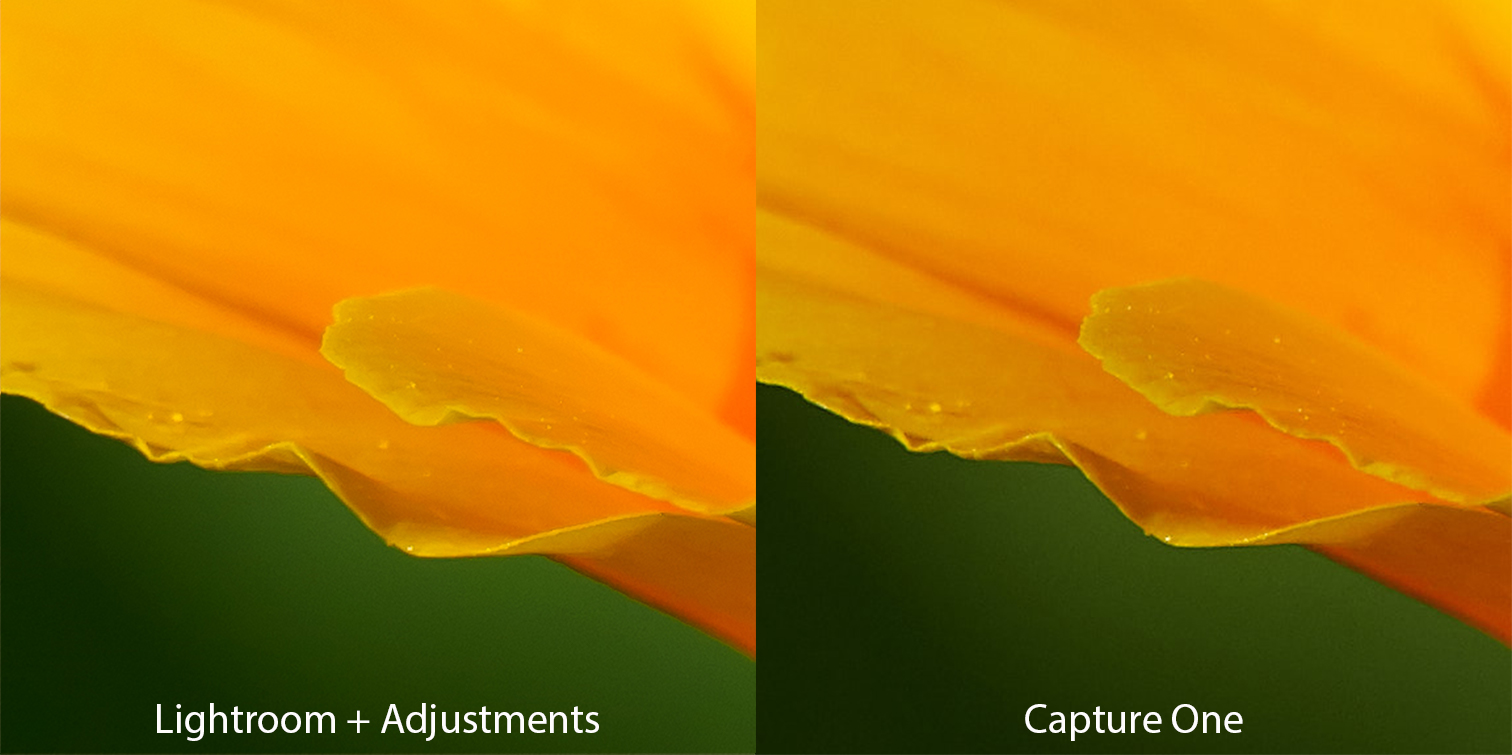
The setting that had the largest effect was to change the Profile in Camera Calibration from Adobe Standard to Camera Neutral. This brought out the vibrant colours that are evident in the Capture One image, but there was still the issue with noise.
The second change was in Noise Reduction. After a lot of adjusting, I settled on a setting of Luminance at 50 and Detail to 25. I’ve managed to get closer, but it’s still not quite there, and some of the detail is lost.
The change to the Camera Calibration could be set on import, but I think that the adjustments to the noise reduction would have to be individual to the image.
In the next comparison image I haven’t made any adjustments to the Capture One image, it is the same as the previous one, but the adjustments I’ve just described for Lightroom, have been applied.
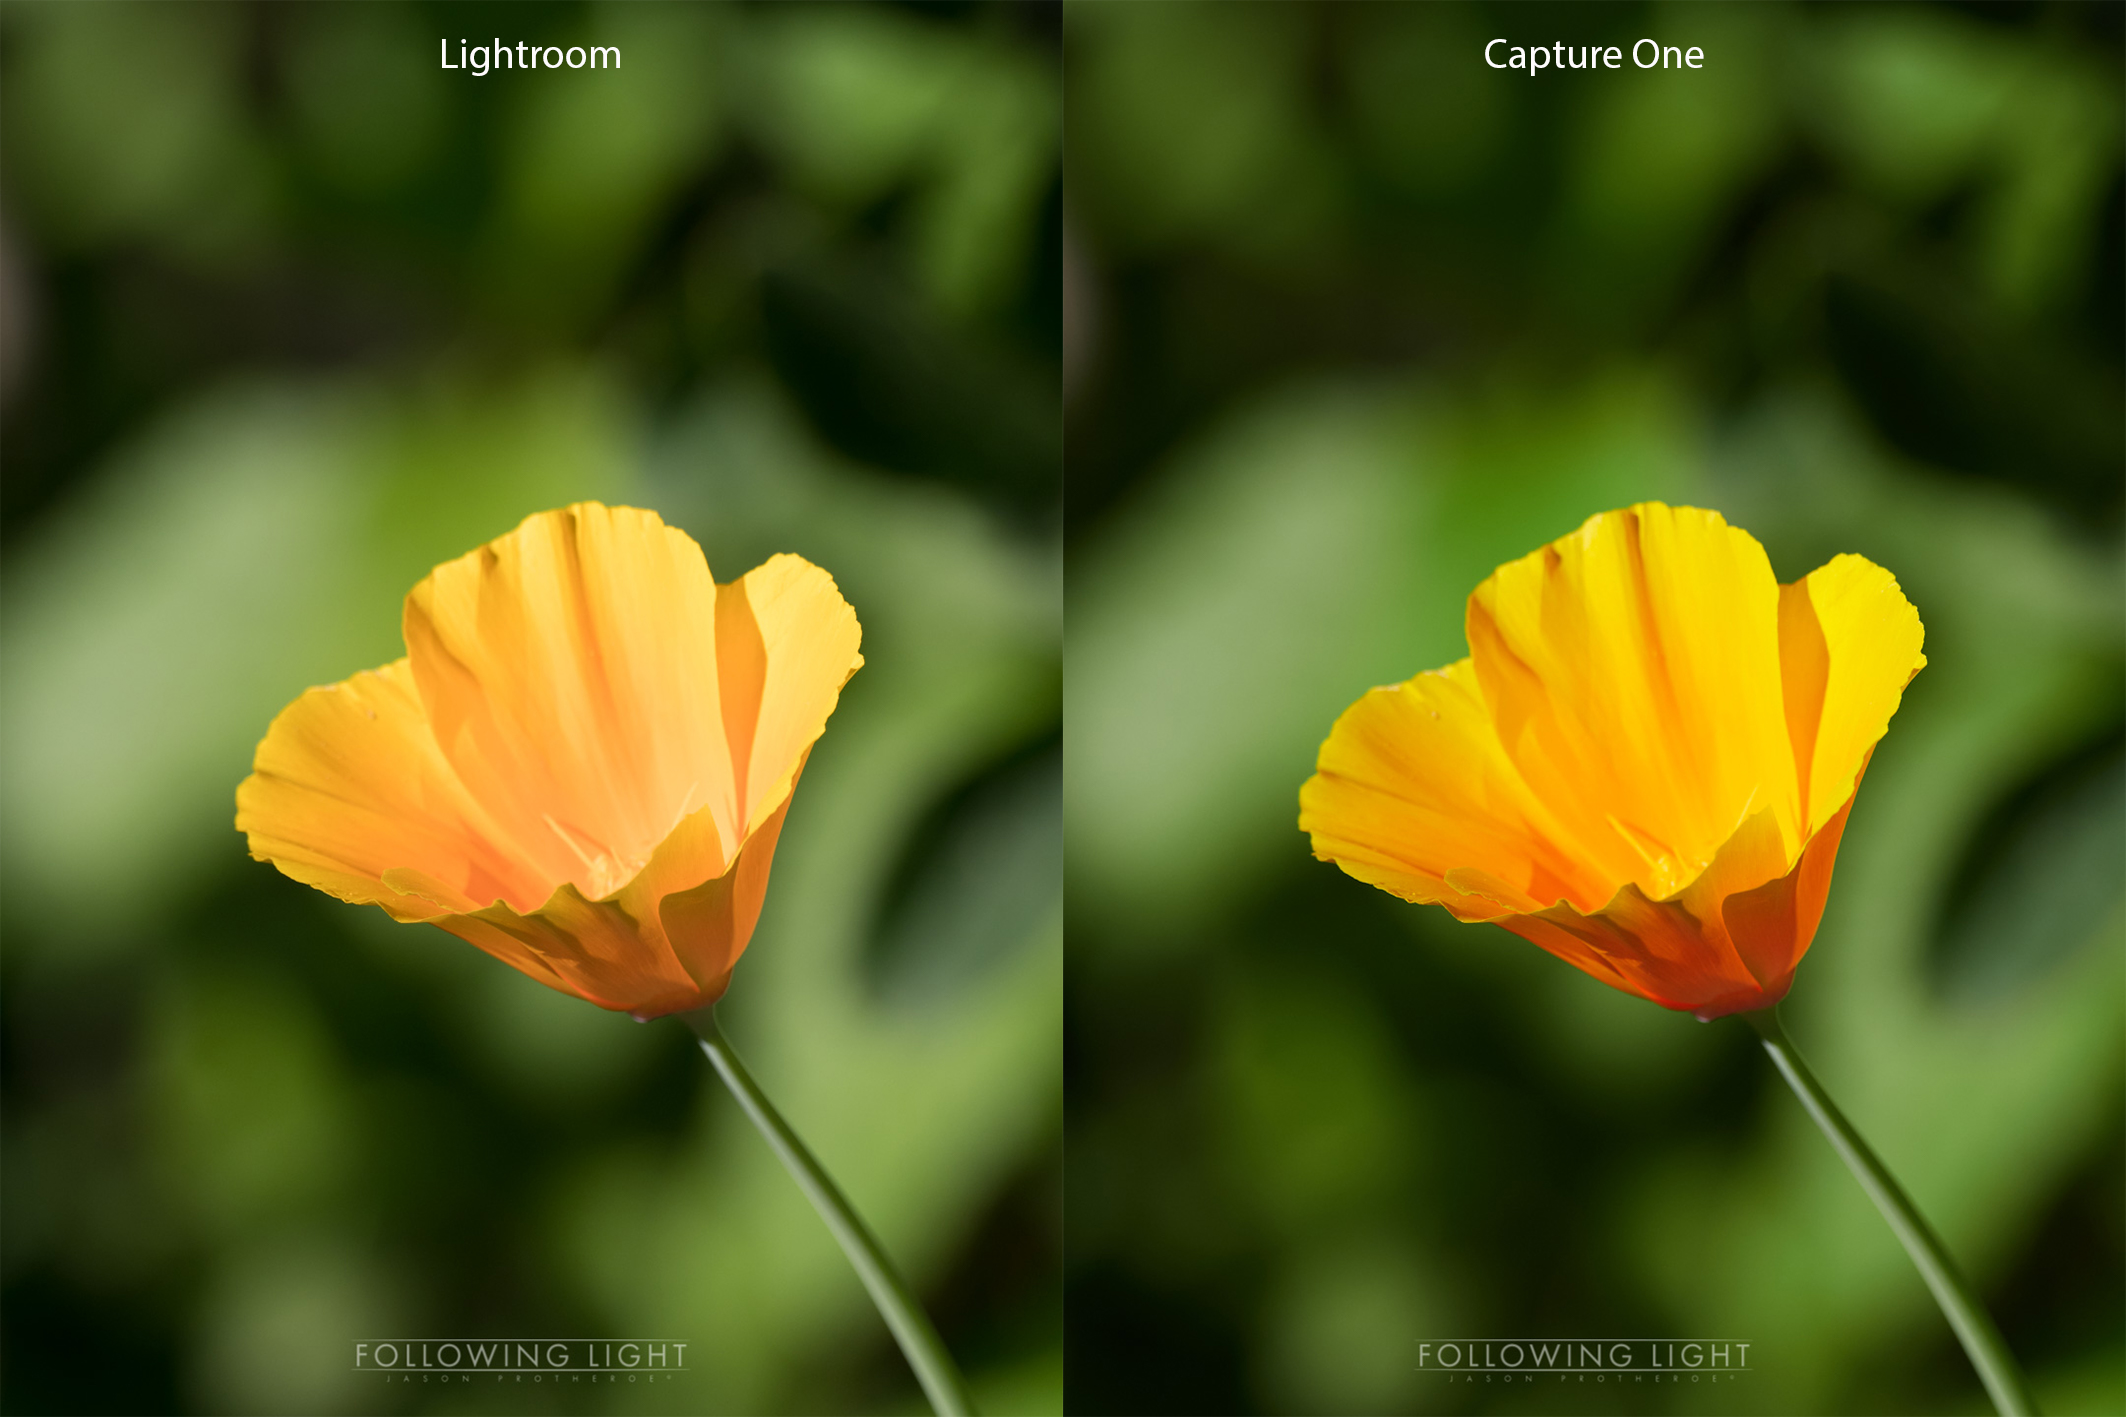
The next comparison is of the complete image, exported from the corresponding software to jpeg with no manual adjustments applied.
So in conclusion, I would be able to get closer to the quality of the native RAW conversion of Capture One within Lightroom, but this would involve manual noise reduction for each individual image and it still wouldn’t be as good as Capture One.
I am convinced that Capture One handles the RAW conversion of ORF files better than Lightroom, so until I get a better grip of Capture One, my workflow is to import ORF files in to Capture One, export them as tiff files, and then import these into Lightroom for processing. Not the cleanest way, but it works for me at the moment.
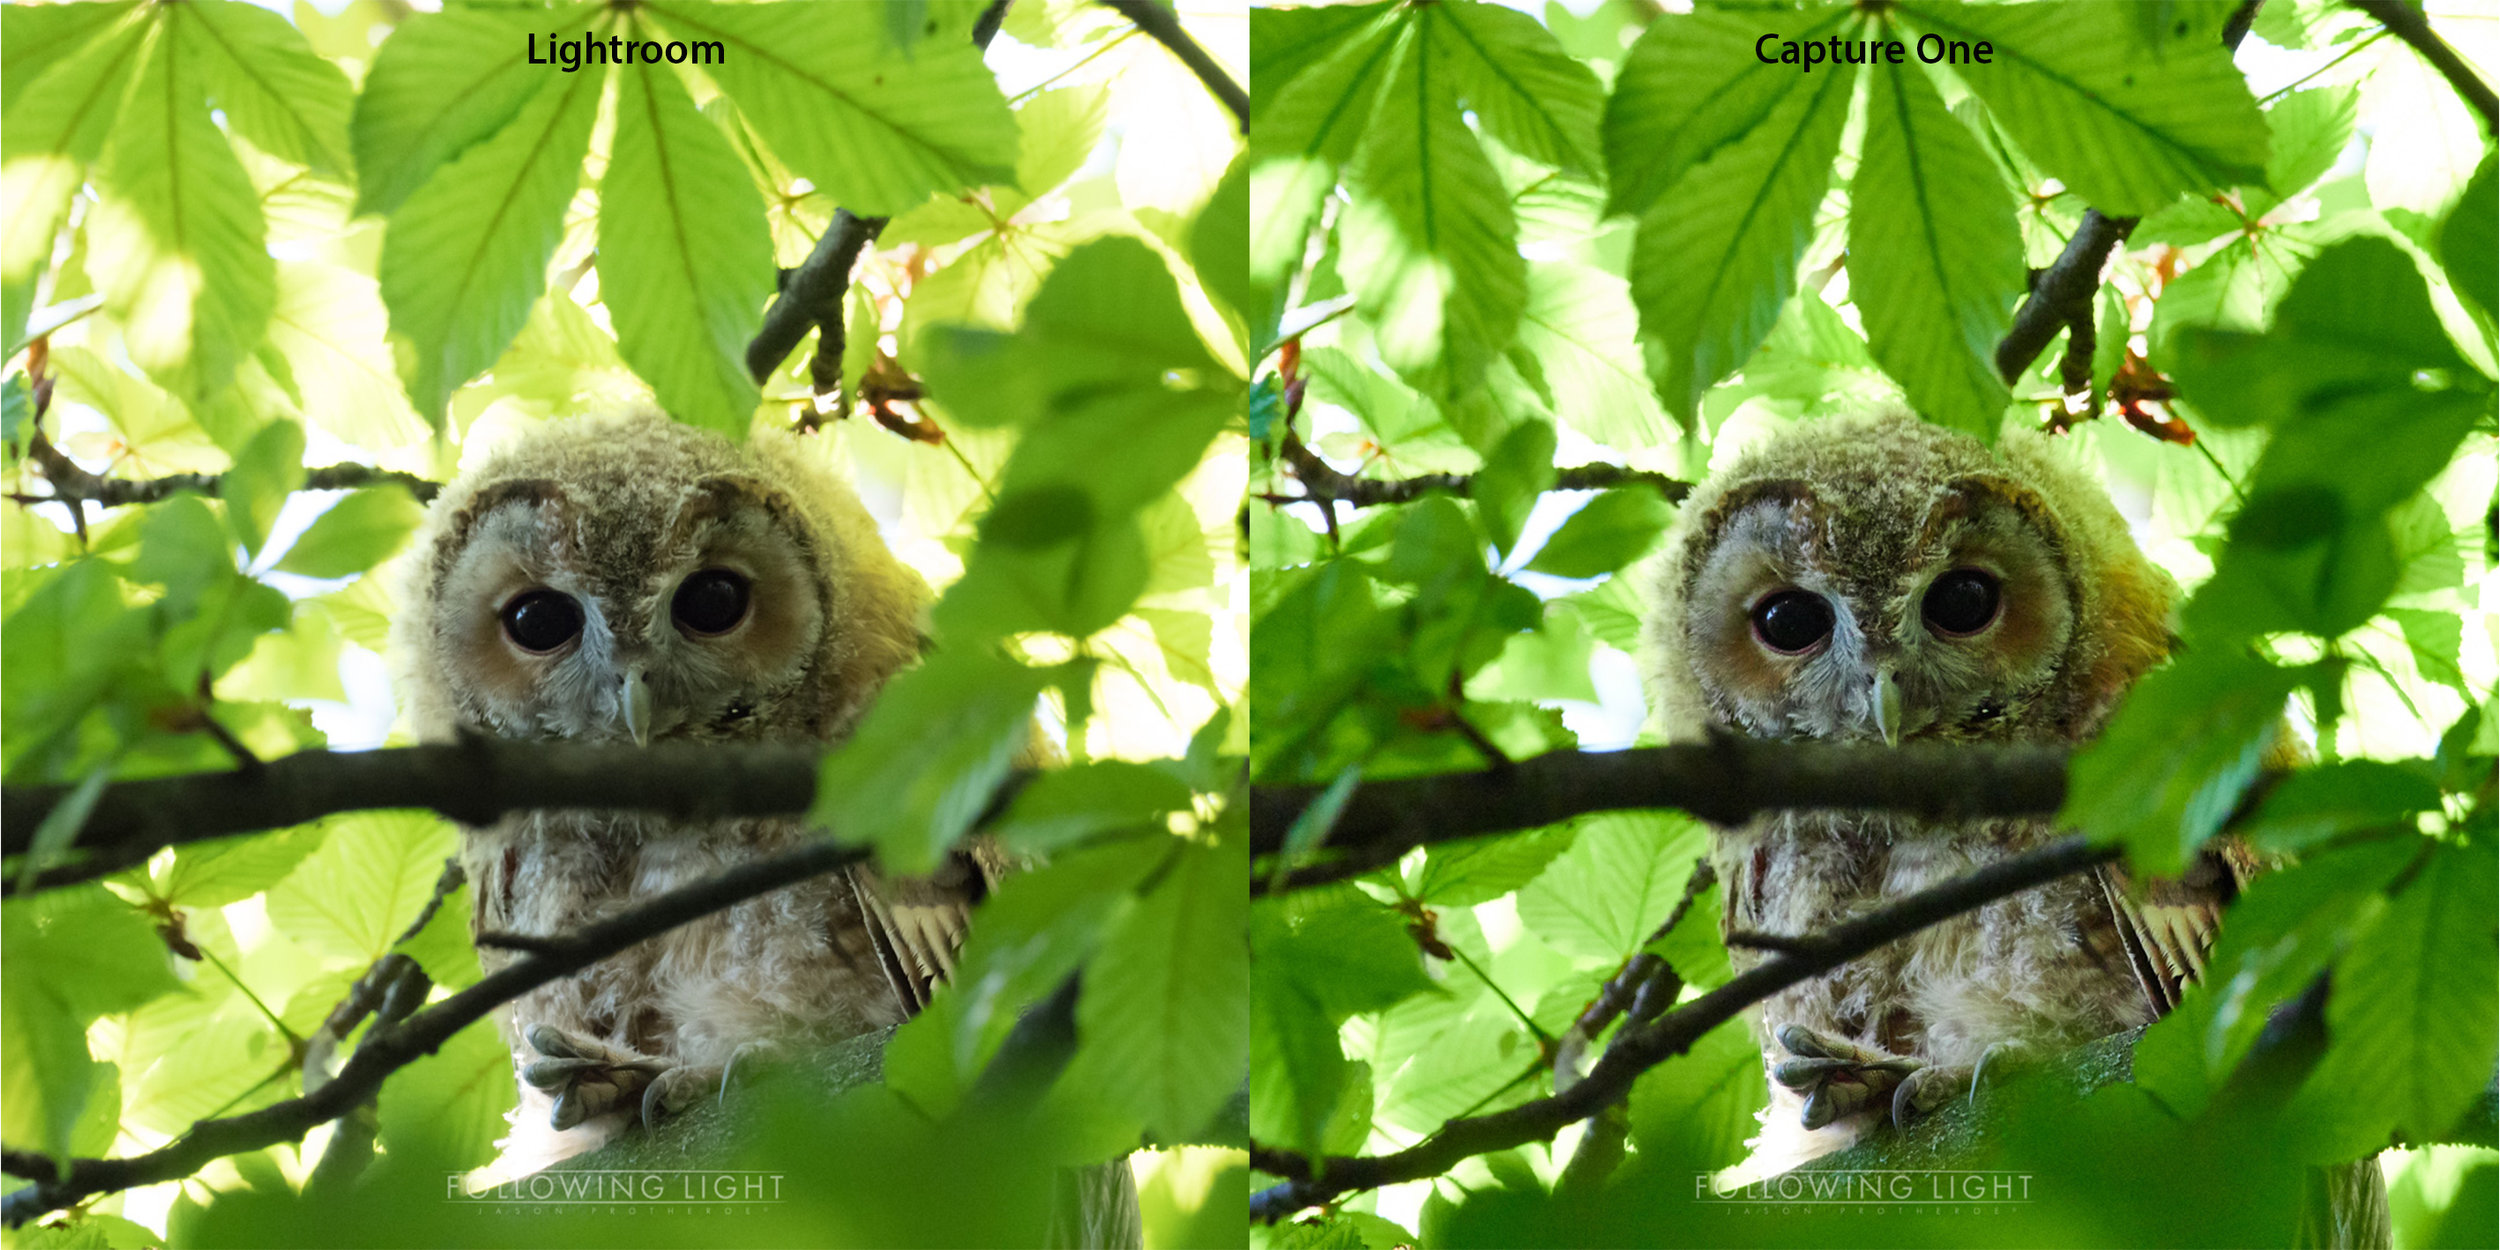
One final complete comparison with an image with a lot more fine details. With the content of other posts recently, one without an image of an Owl just seems wrong.
The details are a lot clearer, and the colours closer to reality. Although this can be seen throughout the image, it is most noticeable around the eyes.
Support us by shopping at Amazon. Thanks.
[easyazon_link identifier=”B01NCIXEN7″ locale=”US” tag=”mhmedia07-20″]Capture One Pro 10 (Mac Download)[/easyazon_link]
[easyazon_link identifier=”B01N6E6WWO” locale=”US” tag=”mhmedia07-20″]Capture One Pro 10 (PC Download)[/easyazon_link]
[easyazon_link identifier=”B00O66FYRS” locale=”US” tag=”mhmedia07-20″]Adobe Creative Cloud Photography plan (Photoshop CC + Lightroom) [Prepaid Card][/easyazon_link]
JOIN OUR FACEBOOK GROUP

“I’m an outdoor photographer based in Basel, Switzerland. The photography bug was caught while hiking the Pembrokeshire Coastal Path in 2011. Living in Switzerland on the border of France and Germany, has given plenty of opportunities to nurture this further in the French Vosges Mountains, the German Black Forest, and the incredible Swiss Landscapes. In 2016 I started to dedicate more time to Photography. I created the Following Light blog as a place to share my experiences as well as show some of my work.”


Paul Francis
May 30, 2017 @ 11:40
About a year or so ago I went through a similar exercise and I compared DXO, LR, Capture One and Olympus Viewer. At the time I has been using LR since V1 and for Nikon and Canon files I thought it was pretty good.
Olympus Viewer is great at processing raw files, but lack of documentation, support and features meant that I would need to export to TIF and continue processing in another package.
LR default processing to my eye resulted in muddy colours, loss of detail and noise, all these require manipulation of each image (yes I know presets can do some of the work but image by image editing is still required)
DXO and Capture One were very close in default processing to Olympus Viewer, but Capture One features made it an easy choice.
Jason Protheroe
May 31, 2017 @ 19:00
It’s nice to know that I’m not the only one that has gone through the process. I’ve had very much the same experience, I used to use Sony and actually still do in some areas. I had no concerns at all with the Sony files. It’s only the ORF files that appear dull, a loss of sharpness and detail.
Nizmo
May 30, 2017 @ 13:57
The main advantages of CO are layers, highlights/shadows recovery and color correction.
In relation to colors most of the time they are good but rendering is different from Olympus native jpegs.
LR lately came very close to OV in terms of colors in Camera Neutral profile but lacks of sharpness and noisy.
Also I don’t understand “native RAW conversion for Olympus images in Lightroom” The only native conversion for Olympus can be OOC Jpegs or OV.
Jason Protheroe
May 31, 2017 @ 18:54
Hello Nizmo, my terminology may by slightly off! What I meant with native conversion, is that way that the files are automatically processed by either Lightroom or Capture One during the import. Your point about the sharpness and noise, is the exact reason why I started to look around for another solution.
amywaco30disqus
May 30, 2017 @ 14:41
I don’t see the Camera Neutral option in LR. How does one find this? Do I need to create or download this somewhere? The only options I see are for Adobe Standard, ACR 4.2 and ACR 4.4.
Jason Protheroe
May 31, 2017 @ 18:32
Unfortunately you won’t be able to find it. As far as I understand it, and please don’t quote me because I’m putting this together from bits and pieces. The Olympus E-510 uses an older ACR (Adobe Camera Raw) process engine, this is why you only see ACR 4.2 and ACR 4.4. It was only with the introduction of ACR 5 that the profile names like ‘Camera Neutral’ were given to cameras (and possibly ACR 6.x for Olympus). I think that we are now up to ACR 10.x
Peter Gallagher
May 31, 2017 @ 00:30
Jason, I think you may find that it’s possible to get very similar results in colors, saturation, noise and sharpness from both LR and CaptureOne.
This is a topic that software experts have debated in depth. May I recommend Martin Evening’s detailed but fair comparison:
here in PDF: http://4bcokm12bvu948gi7312gnab.wpengine.netdna-cdn.com/wp-content/uploads/2016/Lightroom%20vs%20Capture%20One%20Pro.pdf
Of course you have to make comparisons for yourself. I think it’s worthwhile starting to develop an OLY file by zeroing out the ‘hidden’ Adobe Raw development settings (applied in the background after de-mosaicing). I’m not sure how to do that in CO but you can find a guide for LR here (scroll to near the bottom of the article, past the algebra): https://www.rawdigger.com/howtouse/deriving-hidden-ble-compensation. The Adobe raw conversion applies a ‘baseline’ exposure boost of 0.64 to my Olympus PEN-F files (plus 1-ƒstop of additional boost; +33 contrast and -25 blacks; plus a custom tone curve).
If you then conservatively apply exposure, contrast, clarity etc, add some sharpness, use the default luminance and color-noise reduction settings and a modest s-shape tone curve, I think you’ll find that the noise, local contrast and saturation in LR and the default CO settings are very similar. They are for me over a wide range of ISO settings from base (200) to 6400. I also find it very helpful to create a camera color profile and include it in LR. This seems to help with color contrast at different exposure levels.
By the way: you can certainly include any develop settings such as Luminance and Color noise correction (as well as the camera calibration settings) in the Lightroom defaults for any camera using the menu item (Set Default settings…) in the Develop menu.
Best, P
Jason Protheroe
May 31, 2017 @ 18:48
Peter, thank-you very much for taking the time to write. I had searched for something like this before testing it myself, but hadn’t been able to find anything. Strange as I’m usually quite thorough with searching. I would much prefer to remain with Lightroom for processing. Unfortunately I don’t have it right now to go through it, but I wanted to write and thank you for the information.
Julia
July 18, 2017 @ 08:55
Hmm, very interesting. I was having a bit of difficulty, too, to get excited about some of my images when processing them in LR. I have been using LR since its inception, so of course I am hesitant to switch to something else, but your examples really make me reconsider. Thanks for sharing, I’ll download Capture One and give it a go to see how much of a difference it makes for my images.
Luca Viola
September 22, 2017 @ 22:00
I tink that too many people misundertand the Adobe philosophy. LR with his native profile give us a flat profile for a reason not because they are not able to give us a wow picture. The Adobe philosophy is tat if we have a flat image we vcan create on it better than with a semi finished image. Is like paint on a white papar instead than use a paper with drowings and marks. Other software give us a paper with drowings and mark, yes is a gootbstarting point and usually the finished image, but it is just what they thik is correct, not what is in our goal…
Henk Goossens
October 23, 2017 @ 17:08
https://uploads.disquscdn.com/images/60a63c5c153744675c2fffa8e3a66592b1b614678b3d03f8b8c8c8ee495de4c6.jpg https://uploads.disquscdn.com/images/2c824dadf59898ade046dd21f990da2fc61d8538b779756d32477d6a847ccdd5.jpg
At the moment I am testing also Capture One v10.
And indeed I did also some RAW comparison in LR6 and Capture One, my outcome is that the sharpness, colors, and noise or far much better then LR6. But on the other hand the tools you have to use to.
Same color-temperature 4000K
Juan Guerrero
June 30, 2024 @ 01:35
I use DxO first for Olympus raw files, then export to Lightroom. I’ve tested recently LR direct import and the results are still better for DxO. adobe had improved a bit but still behind.
In images taken with high ISO, the difference is even more noticeable.